Good morning,
RAIN HAS QUIT!!! Sun is out and it is a beautiful day :-)
Everything
that Glitters class using the You're So Lovely Project Kit and the
stamps You're so Lovely was so much fun. It was held in March and I did two different sessions. There were some new techniques with this class and everyone didn't complete all the kit in the allotted time, because there were also bags and tags that went with it. I'm really starting to enjoy using kits more for classes. Less preparation for me which helps out.
I'm going to share some of the cards from the kit today.
You have stencils that you can use either the positive or negative of each stencil to get different looks.
With this card you laid the stencil down and ran your brayer all around it and then picked it up and added your design that fit over it. One thing you need to do is put your design over the stencil first to make sure it is going the same direction before you add glue to the design. As you can see, I had to remove the gem shape as I glued it first before checking to make sure it was going to fit the correct way.
The butterfly is just another shape that comes in the kit.
This one is a circle that you stencil on first and then add the wreath design element to it. It gives it another different look rather than just a circle.
This one was done with the solid stencil down and you brayered around it so the ink was on the outside of the design piece.
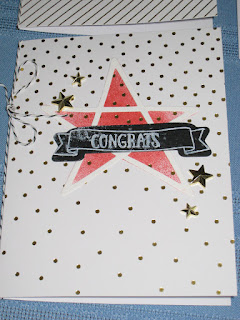
The star design you really have to be careful and figure out which way it is going to go before you glue it down. It does take some work to be sure it fits correctly.
As you can see I didn't let my white craft ink dry enough before I put it on the card and it smeared. So, in class we stamped all the white craft ink sayings first so they would have time to dry. Put those on at the very end as one of the last steps to putting the cards together.
Again you use a circle shape and add the spiral design to it. One thing I like about the brayered look you can make it as light or dark as you want by just continuing to go over the stencil with ink, or also by the different pressure you put on the brayer.
What I liked about doing this class is that everything you needed for the cards were there. All the embellishments,bakers twine. All you did was buy the stamps to go with the card kit. I supplied the Mint Macaron, Watermelon Ink, memento black and the white craft ink needed to complete the kit. This kit was found in the Occasions catalog along with the stamps.
This last picture shows all 12 cards that this kit made.
The kit number is 140590 - $26.00
Stamps - 140762 - 12 photopolymer stamps for $17.00
these are both found on pg. 32 of the 2016 Occasions catalog.
Mint Macaron ink - 138326
Watermelon Wonder - ink - 138323
Memento Tuxedo Black ink - 132708
White craft ink- 101731
Stampin Up has also put out a video showing this kit.
If you would like to purchase these just go to my store and use hostess code: QQEZPFCD.
I will be putting other parts from this kit on next time.
Hugs,
Penny


Cute cards in this kit. I need to check out this technique.
ReplyDelete